Getting Started
Preface
EzQu is short for "Easy Query" and provides a straightforward solution for accessing relational databases using pure Java. The tool is designed to be a comprehensive solution for working with relational databases, offering several advantages over traditional JDBC. Unlike JDBC, which requires writing "String"-based SQL queries, EzQu can be easily integrated into Java applications since it is written in pure Java. Additionally, EzQu uses a fluent API that enables type checking and IDE auto-complete. One of the key benefits of EzQu is its ability to provide full protection against SQL injection, ensuring the security of your database operations.
Ezqu offers a simple API for performing CRUD operations, along with a fluent, SQL-like query API. Familiarity with SQL is beneficial to fully leverage the capabilities of the tool.
Obtaining EzQu
To use the EzQu library, all you need is the ezqu.jar file, which can be downloaded from https://github.com/sbentin/jaqu-orm/releases. Alternatively, you can include it in your project via Gradle or Maven by adding the Centimia repository (https://artifactory.centimia.com) as a source.
Gradle
imlementation 'com.centimia:ezqu:7.0.0'Maven
<dependency>
   <groupId>com.centimia</groupId>
   <artifact>ezqu</artifact>
    <version>7.0.0</version>
</dependency>
Development
It is important to note that EzQu's philosophy is "java first (code first)". In a "Java-first" approach, the ORM (Object-Relational Mapping, EzQu) framework treats your Java classes (entities/POJOs) as the single source of truth for your application's data structure.
What it Means in Practice:
- Schema Generation (DB from Code): You write your Java entity classes first, defining fields, relationships, and constraints using standard Java syntax and EzQu-specific annotations. Although EzQu can create tables, indices and constrains for you, it is not a complete schema maintenance solution. Therefore one doesn't have to generate the schema, use an existing schema but pay attention to several things such as, non-null constraints and Foreign Key constraints which are best to avoid.
- Data Domain Control: Adding columns to the database won't affect the Java code or break EzQU. However, adding Java fields without corresponding database columns will break the ORM, and changing field or column types may also cause ORM issues. If the table already exists, the developers must handle any necessary changes themselves.
Advantages and disadvantages of this approach are discussed here.
EzQu supports working directly with POJOs. As long as the table name matches the class name and the column names correspond to the non-static, non-transient field names, all you need to do is include ezqu.jar in your classpath and you're ready to go. Here are a few things you can do right out of the box:
public class Person {
   private String firstName;
   private String lastName;

   public Person() {}; // must have a default constructor (can be omitted if the only constructor)

   public String getFirstName() {
      return this.firstName;
   }

   public void setFirstName(String name) {
      this.firstName = name;
   }

   public String getLastName() {
      return this.firstName;
   }

   public void setLastName(String name) {
      this.firstName = name;
   }
}
Person p = new Person();
p.setFirstName("john");
p.setLastName("Smith");
sessionFactory.runInSession(db -> {
// this descriptor class is used by ezqu to create the queries in the fluent api, it is not meant to have any data
Person desc = new Person();
// inserts the pojo to a table called "person" with two columns firstName, lastName
db.insert(p);
// select the first result from the 'person' table of a person with first name 'john'
p = db.from(desc).where(desc.getFirstName()).is("john").selectFirst();
// select all the results from the 'person' table with the last name 'Smith'
List people = db.from(desc).where(desc.getLastName()).is("Smith").select();
// update can not be done with db.update() in this case because the Person is lacking a primary key
// we can do update like this: (this will update all rows with last name "Smith")
int count = db.from(desc).set(p.getFirstName(), "Sean").where(p.getLastName()).is("Smith").update();
// delete can not be done with db.delete() in this case because the Person is lacking a primary key.
// we can delete like this: (this will delete all rows with last name "Smith")
int count = db.from(desc).where(p.getLastName()).is("Smith").delete();
});This was a basic demonstration of EzQu's capabilities. Further explanation of the code and related concepts will be provided in later sections of this guide. When working with plain unannotated POJOs, some of EzQu's simplified CRUD operations, such as update and delete, are not available unless a primary key is defined via annotations. However, the fluent query API remains fully usable, as shown in the example.
You can enhance your POJOs by adding annotations to define column mappings and designate a primary key. Once these annotations are in place, the full range of EzQu's CRUD operations becomes available. Below is a basic example of an annotated Person class:
@Table(name="PERSON") // this can be omitted as the name is the same as the class's name
public class Person {
   @PrimaryKey
   private Long id;

   @Column(name="first_name")
   private String firstName;

   @Column(name="last_name")
   private String lastName;

   public Person() {}; // must have a default constructor (can be omitted if the only constructor)

   public String getId() {
      return this.id;
   }

   public void setId(Long id) {
      this.id = id;
   }

   public String getFirstName() {
      return this.firstName;
   }

   public void setFirstName(String name) {
      this.firstName = name;
   }

   public String getLastName() {
      return this.firstName;
   }

   public void setLastName(String name) {
      this.firstName = name;
   }
}
Post compile processing
It's important to understand that EzQu offers advanced features such as inheritance strategies, object relationships, indexing, lazy loading, and more. However, these capabilities are only available when using EzQu's post-compilation processing. The next section covers how to set up post-compilation in your build environment. Once the project is compiled by EzQu post processing it can be deployed to a runtime that only includes ezqu.jar in its classpath.
To support features such as one-to-one, one-to-many, many-to-many, many-to-one relationships, object inheritance, and lazy or eager loading, EzQu performs bytecode enhancement on your classes after compilation. This enhancement occurs during the build process using EzQu's plugins for Gradle, Maven and Ant. Once the code is compiled and enhanced, these plugins are no longer required at runtime.
For Eclipse and IntelliJ Idea users, EzQu also provides an IDE plugin that integrates this post-compilation step into the build process. However, these plugins are intended for development convenience and are not recommended for producing deployment-ready classes or JARs. Producing such jars should be done with the Gradle|Maven or ant build tool plugins.
Gradle Plugin
As mentioned earlier, you can obtain the EzQu gradle build plugin with the following:
buildscript {
    repositories {
        ...
        mavenCentral()
    }

    dependencies {
        classpath 'com.centimia:ezqu-gradle-plugin:7.0.0'
    }
}
After adding EzQu to your project, include the following required settings in each module's gradle.build(if you have several entity modules). When you run the build task, EzQu's post-compile builder will automatically process all annotated classes.
apply plugin:'ezqu'

jar.dependsOn ezquPostCompile
test.dependsOn ezquPostCompile
Maven Plugin
To use the Maven plugin, you need to declare it in your pom.xml. Since you may want it to run on specific modules, you have two main strategies:
- Manual Declaration - For a single module project, add the plugin directly to the pom.xml of the specific modules that require enhancement. This keeps your build clean and avoids running the logic where it isn't needed.
<build>
    <plugins>
        <plugin>
            <groupId>com.centimia</groupId>
            <artifactId>ezqu-maven-plugin</artifactId>
            <version>7.0.0</version>
            <executions>
                <execution>
                    <goals>
                        <goal>ezqu-post-compile</goal>
                    </goals>
                </execution>
            </executions>
        </plugin>
    </plugins>
</build>- Parent Management - If you have a large multi-module project, define the plugin in the Parent POM under
<pluginManagement>, then "activate" it in the child modules by simply referencing the groupId and artifactId.
<!-- In your parent pom -->
<build>
    <pluginManagement>
        <plugins>
            <plugin>
                <groupId>com.centimia</groupId>
                <artifactId>ezqu-maven-plugin</artifactId>
                <version>7.0.0</version>
                <executions>
                    <execution>
                        <goals>
                            <goal>ezqu-post-compile</goal>
                        </goals>
                    </execution>
                </executions>
                <configuration></configuration>
            </plugin>
        </plugins>
    </pluginManagement>
</build>
In the pom.xml of only the modules that actually need the bytecode enhancement, simply add the plugin to the <plugins> block. You don't need to repeat the version or the execution goals because they are inherited from the parent's management block.
<build>
    <plugins>
        <plugin>
            <groupId>com.centimia</groupId>
            <artifactId>ezqu-maven-plugin</artifactId>
        </plugin>
    </plugins>
</build>
Why this is better for Multi-Module projects
- Consistency: If you upgrade to version 7.1.0, you only change it in one file (the parent).
- Selective Execution: Modules like my-project-api (which might just be interfaces) won't run the plugin, saving build time.
- Inheritance: Any configuration you put in the Parent's
<configuration>block will be automatically applied to all children that activate the plugin.
Ant
To build with ant you will need the ezqu-ext.jar in your classpath and add the following to your build.xml:
<taskdef classpathref="projectPath" name="EzquAssembly" classname="com.centimia.orm.ezqu.ext.ant.EzquAssemblyTask"/>

 <target name="EzquAssembly" depends="main">
    <!-- the outputDir is the directory where the original .class files before post compile reside -->
    <EzquAssembly classOutputDirectory="${outputDir}"/>
 </target>
Using in Development
In development, when you need to run your application locally for testing and debugging, if your project contains multiple modules and you're not using Eclipse or Idea with their EzQu plugins, create a dedicated 'Runner' project to execute the app with Gradle or Maven in your IDE (Also applies to Eclipse or Idea, if you don't want to use the plugin). The runner should provide a main class, and its Gradle|Maven build must declare all required modules as dependencies. It is not necessary to include this "Runner" project in your final deployment, unless of course this is how you start your application.
When running test suites or JUnit tests, you must trigger the post-compilation step at the start of the test build. In Gradle, you explicitly define task dependencies (like dependsOn 'ezquPostCompile'). In Maven, the "magic" happens through the Build Lifecycle. Since the plugin is already annotated with defaultPhase = LifecyclePhase.PROCESS_CLASSES, it will automatically run every time you run mvn test or mvn install. This is because process-classes occurs before test-compile and test. However, in gradle you need to add the necessary configuration to your gradle.build file to accomplish this.
Following is a a gradle.build file that shows both the "Runner" settings and settings for test.
project.ext.set("publishartifactid", "DevRunner")
archivesBaseName = 'DevRunner'
version = '1.0.0'

apply plugin: 'application'

mainClassName = "com.acme.ServerLauncher"

dependencies {
    api project (":CommonBase")
    runtimeOnly project (":Module1") // or testImplementation or implementation
    runtimeOnly project (":Module2")
    runtimeOnly project (":Module3")

    testImplementation platform('org.junit:junit-bom:6.0.1')
    testImplementation 'org.junit.jupiter:junit-jupiter'
    testImplementation 'org.junit.platform:junit-platform-suite:6.0.1'
    testImplementation 'org.junit.platform:junit-platform-launcher:6.0.1'
}

repositories {
    ...
    mavenCentral()
}

tasks.register('myProjectTest', Test) { // any name you want
    // When the test task is launched, start the JVM in debug mode
    if (project.hasProperty('debug') && project.property('debug') == 'true') {
        doFirst {
            jvmArgs "-agentlib:jdwp=transport=dt_socket,server=y,suspend=y,address=localhost:5005"
            println '=== Test JVM is waiting for a debugger on port 5005 ==='
        }
        systemProperty 'logLevel', 'debug'
    }

    testLogging {
        events = ['passed', 'failed', 'skipped', 'standardOut', 'standardError']
        showExceptions = true                         // print stacktrace
        showCauses     = true                         // print cause chain
        showStackTraces = true                        // always print stacktraces
        exceptionFormat = 'full'                      // full message + stack trace
    }

    // make this task run only the MyTestSuite class (or any name you give your suite)
    include '**/MyTestSuite.class'

    // use JUnit-5
    useJUnitPlatform()

    // run the ezquPostCompile task first
    dependsOn 'ezquPostCompile'
}
to run your test just type:
gradle clean myProjectTest
or
gradle clean myProjectTest -Pdebug=true (for allowing remote debug of your code)
Eclipse Plugin
EzQu provides an Eclipse plugin that seamlessly handles post-compilation tasks, enabling developers to run EzQu-based code directly within the Eclipse build system. The plugin adds a custom Java builder to the project's build path, which automatically detects and processes EzQu code. It also annotates EzQu entities and ensures that ezqu.jar is included in the project's classpath.
The eclipse plugin can be obtained from the eclipse plugin site: https://www.centimia.com/EzquPluginSite
Once obtained and installed you can add the EzQu nature by clicking Add/Remove Ezqu Nature in the project's context menu:
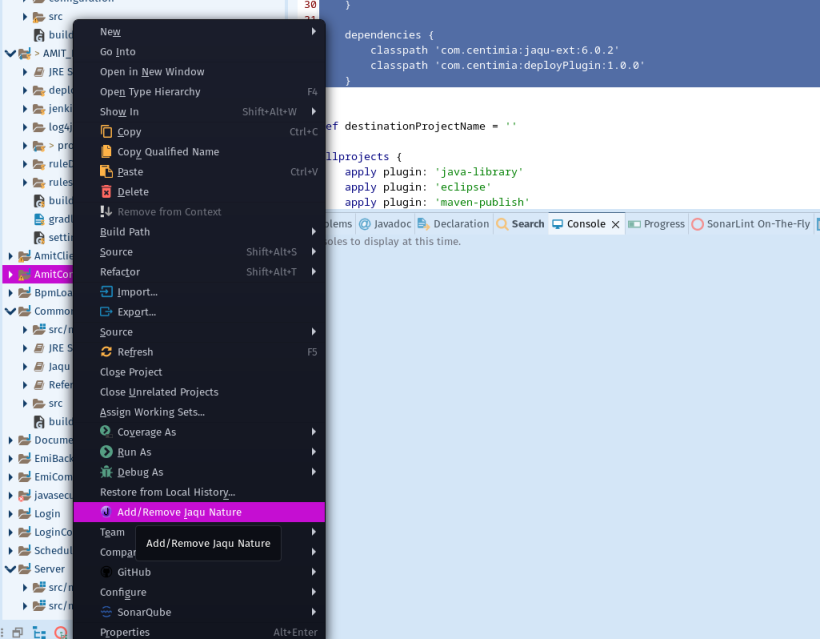
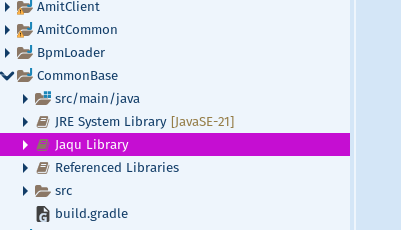
When the EzQu nature is added to a project in Eclipse, a classpath entry for EzQuPlugin is automatically included. All classes annotated with @Entity will display an EzQu badge, and an EzQu builder is added to the project's list of builders.
Whether you rely on Eclipse's automatic build or trigger the build manually, the EzQu builder processes all @Entity-annotated classes, generating and post-compiling the necessary enhanced classes. These post-compiled classes are then seamlessly integrated into the project's runtime environment, meaning any code executed from within Eclipse will use the enhanced versions.
The Gradle plugin and Eclipse plugin can coexist within the same project. This setup enables you to use Eclipse's standard run mechanisms during development, while relying on Gradle to build deployment artifacts. However, running certain Gradle dependency tasks may override or remove your Eclipse EzQu plugin settings. To prevent this, consider adding the following configuration to your build script.
// Adding EzquBuilder & EzquNature to project when running 'eclipse' task.
afterEvaluate { project ->
    if(project.plugins.hasPlugin('ezqu') && gradle.startParameter.taskNames.contains('eclipse')) {
        println ":$project.name:added Ezqu nature to eclipse project"
        project.eclipse.project.buildCommand 'com.centimia.orm.ezqu.plugin.builder.ezquBuilder'
        project.eclipse.project.natures 'com.centimia.orm.ezqu.plugin.nature.ezquNature'
        project.eclipse.classpath.containers 'com.centimia.orm.ezqu.plugin.nature.EZQU'
    }
}
IntelliJ Idea Plugin
EzQu also provides an IntelliJ Idea plugin, like in eclipse, it also seamlessly handles post-compilation tasks, enabling developers to run EzQu-based code directly within the Idea build system.
To obtain the latest release of the plugin (EzQu-Plugin.zip) download it from the following url: https://github.com/sbentin/EzQu
After obtaining the zip file you need to install it manually into your IDE. Go to settings->plugins. On the right, click on the cog sign and select "Install Plugin from Disk". Select the archive file you have just downloaded and whalla, you're all done!

Unlike Eclipse, you don’t have to apply the plugin to each project. Once the plugin is installed and enabled, it automatically scans your modules, finds all EzQu‑annotated files, and performs the required actions. You can then use IntelliJ’s build and run system (instead of Gradle) to launch your project from the IDE. The plugin also highlights annotated files and indicates which ones have been post‑compiled.
